Non-mirror double knitting is a fascinating technique, but because you have to control the front and back independently, the chart symbols might look like a cryptic code at first. For your convenience, our studio provides two methods: 'Simple Chart' and 'Detailed Chart'. If you read along slowly, anyone can perfectly understand the principles of these charts.
1. How to Read a Simple Chart
A simple chart is a compressed chart designed to let you grasp the overall flow of the pattern at a glance. One grid cell in the chart represents one knit stitch and one purl stitch (a pair of 2 stitches in total).


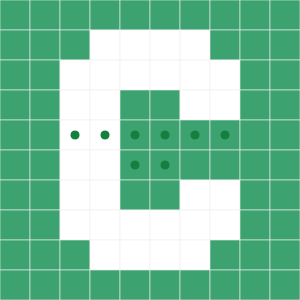
The Secret of the Dot (•)
If you look closely at the simple chart, you'll notice cells with a dot (•) among the colored squares.
- Cells without a dot (•): These are stitches where the yarn colors on the front and back cross differently. (e.g., green on the front, white on the back) This is a standard colorwork double knitting stitch.
- Cells with a dot (•): These are stitches where the yarn color on the front and back is identical. (e.g., green on the front, green on the back) This is the core part of non-mirror double knitting.
[Cells without a dot (•)]
- Odd Rows (Right → Left): Knit using the color shown on the chart, and purl using the opposite color yarn.
- Even Rows (Left → Right): Since you are knitting while looking at the back, you must think in reverse. Knit using the opposite color of the chart, and purl using the color shown on the chart.
[Cells with a dot (•)] - Memorize this!
- Regardless of odd or even direction, absolutely grab the 'exact color shown on the chart' to perform both the knit and purl stitches. Because both front and back must show the same color!
Learning to Knit a Simple Chart by Example
Let's assume we have a simple chart (front-facing) measuring 5 cells × 2 rows like the following:
[Knitting Row 1] (Right to Left ←)
Row 1 is an odd row, so we read and knit from the far right cell to the left. Since we are looking at the front, the color shown on the chart is the knit color.
- 1st from right (White): Knit White, Purl Green
- 2nd from right (Green): Knit Green, Purl White
- 3rd from right (White+Dot): Has a dot, so Knit White, Purl White
- 4th from right (Green+Dot): Has a dot, so Knit Green, Purl Green
- 5th from right (White): Knit White, Purl Green
[Knitting Row 2] (Left to Right →)
Row 2 is an even row, so turn the fabric and knit while looking at the back. Read the chart from the far left cell to the right, and knit with the color opposite to what you see.
- 1st from left (Green): Read backward, Knit White, Purl Green
- 2nd from left (White+Dot): Has a dot, so do not read backward, Knit White, Purl White
- 3rd from left (Green): Read backward, Knit White, Purl Green
- 4th from left (White): Read backward, Knit Green, Purl White
- 5th from left (Green+Dot): Has a dot, so do not read backward, Knit Green, Purl Green
The Highly Recommended 'Alternate View' Mode! ✨
Do the above rules still feel headache-inducing and complicated? If so, try turning on the [Alternate View] mode provided by our studio's 'Interactive Viewer'.
The Alternate View mode shows the 'actual sequence of yarn colors' to knit in the current row directly on the screen. Regardless of whether it's an odd or even row, and without needing to read the chart backward, you simply read the brightly highlighted stitches on the screen in order from right to left.
However, you must still strictly follow the basic knitting rules of the simple chart. That is, if it's a stitch with a dot (•), knit and purl once in that color. If it's a stitch without a dot (•), knit with the visible color and then purl with the opposite color. We strongly recommend utilizing this convenient feature!
2. How to Read a Detailed Chart
The detailed chart unravels the 1 cell (pair) of the simple chart into 2 separate cells. It's highly useful when you want to accurately pinpoint and knit each stitch one by one.
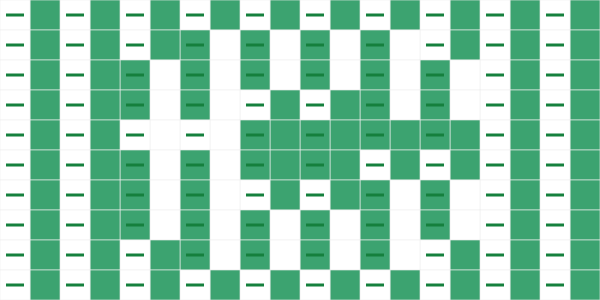
- Direction: Read odd rows from right to left, and even rows from left to right.
- Meaning of Columns: Odd columns (1, 3, 5...) are front stitches, and even columns (2, 4, 6...) are back stitches.
- Meaning of the Symbol (-): A symbol indicating an even column, meaning a back stitch. This symbol visually helps distinguish knit/purl stitches accurately without confusing the rows.
- Odd Rows: Knit odd columns (front) and purl even columns (back). Just grab the yarn of the exact color shown in the chart cells.
- Even Rows: Since even rows are knitted with the fabric turned around, the inside and outside are swapped. That is, purl the odd columns (originally front) and knit the even columns (originally back).
Learning to Knit a Detailed Chart by Example
This is an example of a detailed chart covering 3 cells of a simple chart (total of 6 stitches). Even columns clearly display the symbol (-) indicating the back.
[Knitting Row 1] (Right to Left ←)
Row 1 is an odd row, so read and knit from the far right stitch to the left. Odd columns are front (knit), even columns (-) are back (purl).
- 1st from right (White): No symbol, so Knit White
- 2nd from right (Green -): Has a (-) symbol, so Purl Green
- 3rd from right (White): No symbol, so Knit White
- 4th from right (White -): Has a (-) symbol, so Purl White
- 5th from right (Green): No symbol, so Knit Green
- 6th from right (White -): Has a (-) symbol, so Purl White
[Knitting Row 2] (Left to Right →)
Row 2 is an even row, so turn the fabric and knit while looking at the back. Because the inside and outside are swapped, read from the left stitch to the right, knitting the even columns with the (-) symbol and purling the odd columns.
- 1st from left (Green -): Has a (-) symbol, so Knit Green
- 2nd from left (White): No symbol, so Purl White
- 3rd from left (Green -): Has a (-) symbol, so Knit Green
- 4th from left (Green): No symbol, so Purl Green
- 5th from left (White -): Has a (-) symbol, so Knit White
- 6th from left (Green): No symbol, so Purl Green